April 30, 2010

Published April 30, 2010 by

Creating GWT Project in NetBeans

If the GWT4NB plugin is already installed just directly follow the steps below, otherwise read GWT4NB : Plugin for Creating GWT Applications in NetBeans first.

1. Go to File | New Project...
2. Select Java Web from Categories and Web Application from Projects; press Next.


3.Give a Project Name, Browse the Project Location; press Next.


4. Select the Server, Java EE Version and write the Context Path; press Next.


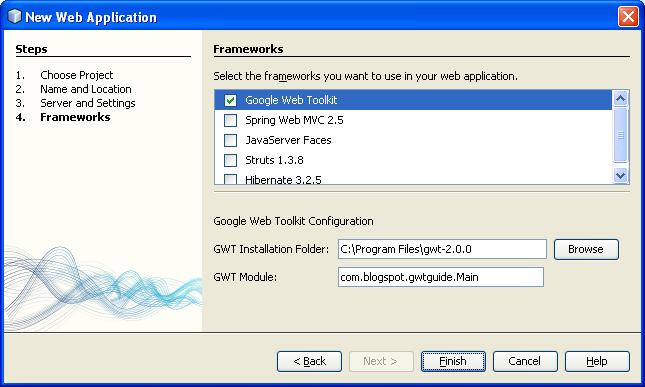
5. Select Google Web Toolkit from Frameworks, Browse GWT Installation Folder, write name for GWT Module; press Finish.


GWT Project is now created.


Read More
Published April 30, 2010 by

GWT4NB : Plugin for Creating GWT Applications in NetBeans

GWT4NB is a support plugin for NetBeans. The GWT4NB project aims to enable developers to take advantage of both: the superior support for creating Web Applications built into the NetBeans IDE and the power of GWT (Google Web Toolkit).

Functionalities provided by GWT4NB includes:

- Using GWT with new or existing web project
- Deployment, running and debugging GWT applications
- Assistance in code editing like creating RPC services.

Go to https://gwt4nb.dev.java.net/ to learn more about this Java tool. This article guides you to setup the plugin in NetBeans.

Download GWT4NB:

For downloading the plugin go to https://gwt4nb.dev.java.net/servlets/ProjectDocumentList?folderID=7081&expandFolder=7081&folderID=0 and download the latest stable version.

Install GWT4NB in NetBeans:

1. Go to Tools | Plugins | Downloaded
2. Click Add Plugins...
3. Open the plugin file which you downloaded earlier. Plugin file name is org-netbeans-modules-gwt4nb.nbm.

4. Then click install.| Next
5. Accept the terms in license agreement and press Install
6. If the Validation Warning is shown press Continue.
7. Press Finish | Close.

After installing the plugin you will get Google Web Toolkit Framework option will be added in the framework list. Now you can start building GWT application in NetBeans easily.
Read More

April 14, 2010

Published April 14, 2010 by

Create JPA Entity Classes from Database

This is a straight forward tutorial for creating Java Persistence API (JPA) Entity Classes in NetBeans IDE based on an existing relational database.

Entity classes are used to represent objects whose lifespan is longer than a typical program execution. This feature in NetBeans creates an entity class for each selected table, complete with named query annotations, fields representing columns, and relationships representing foreign keys.

1. Go to File | New File...
2. Select your Project (Inventory Management System in this example). Select Persistence form Categories and Entity Classes from Database from File Types.


3. Press Next.
4. Select the Database Connection. If you want to know how to create the connection, read the post Create Database Connection in NetBeans.
5. After selecting the connection, available database tables will be listed from which you just add the tables by pressing Add or Add All.


6. Press Next.
7. Class Names are listed. You can change the names if you want.Give a package name (ims.beans in this example).


8. Press the button Create Persistence Unit. Give a Persistence Unit Name or leave it for the default name. In this example the name is Inventory_Management_SystemPU. To know about the persistence unit and associated concepts read Managing Entities - the Java EE 5 Tutorial.
9. Select EclipseLink from the Persistence Library. Other library options are Hibernate, TopLink etc.
10. Select None from the Table Generation Strategy.


11. Press Create.
12. Press Next to Specify Mapping Options. Set default as the Association Fetch and java.util.List as the Collection Type. Alternative collection types are java.util.Collection and java.util.Set.


13. Press Finish and see all the entity classes are generated in the selected package.
Read More
Published April 14, 2010 by

Create Database Connection in NetBeans

This is a very straight forward and step by step tutorial for creating a new MySQL database connection in NetBeans IDE.

1. Go to the Services window, click right mouse button and press New Connection. If the Services window is not available in the NetBeans window, go to Window menu and select Services.


2. Provide the following information in the new dialog appeared.
    Driver Name: MySQL (Connector/J Driver)
    Host: localhost (if the host is on the local computer otherwise the URL of the host)
    Port: 3306 (it is the default port for the MySQL server, if it is changed in your computer use that one)
    Database: name of the database (inventory in this example)
    User Name: name of the user (root in this example)
    Password: password of the MySQL server


3. Press OK. Database connection is now created.


Now you can use this connection for further tasks.
Read More